| Instructor: | Jim Crumley |
| Office: | 107 Peter Engel Science Center |
| Email: | jcrumley@csbsju.edu |
| Phone: | 363–3183 |
| Office Hour: | 1 pm MTF days (or by appointment or just stop by) |
| Lab: | 1:00–5:00 Day WR |
| Room: | 112/118/146/319 Peter Engel Science Center |
| Web Site: | http://www.physics.csbsju.edu/jcrumley/370/ |
A lab assignment and three experiments will be completed by each lab group during the semester. All groups will be doing the Rocket and Magnetopause experiments, and either the coupled pendulum, speed of sound, or torsion pendulum experiment. The experiments will be graded based on your lab notebooks. As well as recording your data and doing the necessary calculations, be sure to answer all of the questions from the lab in your notebook. The final project for this course is a formal lab report about one of your labs.
Roughly half of the time there will be a lecture at 1:00 pm introducing the concepts behind a lab and tools needed for a lab. You are free to work on the experiments when you like as long turn the assignments in on time, though I recommend that you do at least some of your work during the scheduled lab periods. Note that points will be deducted for late assignments. Also, note the due dates for labs in the schedule below.
Keeping a clear, complete lab notebook is an important scientific skill and much of your grade for this class will be based on your notebooks. Refer back to your Physics 191 and 200 lab manuals for a list of what must be included in your lab notebook. Note in particular, that you must include a Procedure section which fleshes out what you actually did. Also, note that though your partners and you are expected to work on the lab together, each partner must hand in a lab notebook for each experiment. Finally, though you should discuss your answers to the lab questions with you partner, each partner should answer the questions in their own words.
| Dates | Lecture | Due |
| 1/15-16 | Introduction / Unix Tutorial | — |
| 1/22-23 | Rocket Lab / Mathematica Tutorial | Unix Tutorial |
| 1/29-30 | Magnetopause Lab | Mathematica Tutorial |
| 2/05-06 | Torsion Pendulum & Speed of Sound labs | — |
| 2/12-13 | — | — |
| 2/19-20 | — | — |
| 2/26-27 | — | 1st of 3 labs |
| 3/12-13 | — | — |
| 3/19-20 | — | — |
| 3/26-27 | A few words on Formal Lab Reports | 2nd of 3 labs |
| 4/02-03 | Sr. thesis topics | — |
| 4/09-10 | — | — |
| 4/16-17 | — | Draft of Formal Report |
| 4/23-24 | — | — |
| 4/30-5/01 | Drafts returned | 3rd of 3 labs |
| 5/07-08 | — | — |
| 5/15 | — | Formal Report & Thesis topic |
The grade for this class will be based 25% on the formal lab report and 75% on the lab notebooks, tutorials, and senior thesis proposals.
Modern versions of Linux allow an experienced computer user to do normal computing tasks immediately without any additional training, but to begin to harness some of the power of Linux a little work is required. In particular, much of the power of Linux and other Unix variants can be found in their command line interfaces (CLIs). Many current users of Microsoft and Apple operating systems have little experience with CLIs and are only used to graphical user interfaces (GUIs). The purpose of this exercise is to you expose to the Linux CLIs in order to give you the experience necessary to be more productive using Linux and other Unix operating systems in the future. Note that if you find the Unix tools that you will learn about here useful, there are options for available for installing them on your Microsoft Windows computers. MacIntosh OS X users will find that most of the tools mentioned here are already installed on their computers (though they may not be well advertised), and the once that are not can be downloaded fairly easily.
You will probably find many occasions during this lab when you will want to transfer files back and forth between your Windows and Unix accounts. While there are many ways to do this (including email them to yourself, put them a USB drive, or on a CD), the easiest ways involve transferring the files directly between the accounts involved. To get this to work takes some setup. In this section I will explain how you can get direct access to your Windows files from Linux, and vice-versa.
webdavs://WINDOWS_USERNAME@homedir.csbsju.edu/homedir/WINDOWS_USERNAME,
where you should replace WINDOWS_USERNAME with you username. When you attempt to go to that link, you should be prompted for your password. This should allow to to move files between your accounts using Konqueror by using Konqueror as a file manager similar to Microsoft’s Windows Explorer. You can drag and drop files, etc.
https://homedir.csbsju.edu/homedir/WINDOWS_USERNAME.
While these directions are for accessing Linux files from Windows, we are going to set it up using Citrix, a program which lets you run Windows programs from Linux.
\\samba.csbsju.edu\YOUR_UNIX_USERNAME
where you should replace YOUR_UNIX_USERNAME with your Unix username (e.g. abstuden).
Before we get to learning about the Linux CLI, I would like you to play around a bit with the Linux GUI. Explore the menus. Try out a few programs. Change some of the settings (maybe the wallpaper?). Then pick a game (alas, there used to be more choices) that you have never played before and try it out for a few minutes. Write down the name of the game, how it works, and what score you got (if the game has a score) in your lab notebook. Or since their are so few games, try another program that you have never used before, play with it, and write notes on what you have tried. Some good ones to try include gimp (Gnu Image Manipulation Program - under “Graphics” on the menu), xfig (also under “Graphics”), or Aladin (under the “CSBSJU—Physics” menu.
The Unix tutorial at http://www.ee.surrey.ac.uk/Teaching/Unix/index.html will be the focus of this exercise. Start at the first section and work your way through the entire tutorial.Make sure that you do all of the exercises listed.
The tutorial is setup for users at another college, but all of the commands in it should work here as well, though the file paths are different. Another thing to note about the tutorial is that it uses the command shell called csh. Here at CSB/SJU we use another shell, tcsh which is based on csh, but has some more advanced features. This should not be a problem because tcsh is more or less a superset of csh, so you should be able to do everything in the tutorial. Note, though that there are other shells that are not as compatible with tcsh. In particular, the most commonly used shell on Linux is bash and bash has many syntax differences from tcsh. If you would like to try a different shell, you can type its name at the command prompt. You can also change your default shell, but I wouldn’t recommend that at this point.
To run through this tutorial you should log into one of the department’s Linux computers. Start up a web browser — Mozilla, Firefox, Konqueror, or any other browser should work fine — and go to the page mentioned above. To run the examples described in the tutorial you will also need to have a terminal window (also known as a command shell) open. There are several types that will work: xterm, konsole, gnome-terminal, and rxvt to name a few.
For this exercise, you need to keep a record of the commands that you typed. I recommend that you use the script command to do this. After you open a terminal type: script tutorial.txt — where “tutorial.txt” is the file name that your commands will be saved in. When you are done with you session, type “exit” and it will be saved. If you have to stop this exercise and start it up again you will want to use a different file name the second time (e.g. script tutorial2.txt, otherwise you will lose your work from the first file.
Note that for this exercise each of you should work on your own. You are free to ask for help from other students, but do the entire tutorial yourself.
Before you get started let me add a couple more time saving hints. In tcsh (and bash), you can scroll through previous commands that you have typed with the up and down arrow keys. This is a big time saver if you make a typo. “Tab completion” is a related feature. When you are typing the name of a command (or file), if you hit the “Tab” key, bash will attempt to complete the command (or file) name for you.
Also, Unix (or more accurately the X Windows System which provides the GUI for most Unix systems) has several methods of copy and pasting. The Unix style way of copy and pasting is to select text using the left mouse button, then move the pointer to the place you want to paste to, and then click the middle mouse button. Try it a little bit. This method would make it quite easy to do this entire assignment without doing any typing, but I suggest you type most of the commands given, since that will make it more likely that you will remember them. Many programs also support the Microsoft Windows style copy and pasting from their “Edit”menus (also available using Control-C, -V, and -X). Another trick with the middle mouse button involves web browsers. If you middle click on a link in most Unix browsers, the linked page will open in a new tab or window. Also, if you select the text of an URL with the left mouse button, and you paste to a blank spot on web page, the URL will be loaded on the browser. (You can also configure Firefox and Mozilla to act this way on Windows and Mac computers.)
Also, if you get stuck while running a program from the terminal try hitting Control-C, which should exit out of the program. If that does not work, you can also try Control-Z, which suspend the program.
Another useful command is finger. Try: “finger YOUR_USERNAME” and “finger jcrumley”.
After completing the tutorial, do the following tasks:
Hand in your lab notebook when you are done with this exercise.
Computational tools beyond handled calculators are now a necessary part of any physicists repertoire. There are a wide variety of available tools including computer codes that are written to solve specific problems, mainstream software tools (such as spreadsheets and databases) which can be applied to physics problems and finally mathematical tools (such as Mathematica, Matlab, Maple, Mathcad, et cetera). We will make use of tools of all of these types in this course. The purpose of this exercise is to introduce you to one of these mathematical tools, Mathematica. Mathematica distinguishes itself from its competitors with its abilities to do exact symbolic, as well as numerical, calculations. These abilities allow Mathematica to, for example, give the solution of

In this exercise, you will first work through a Mathematica tutorial to get an idea of Mathematics’s abilities. Then you will use Mathematica to work a more complicated physics problems.
Start up Mathematica (this tutorial can be run on any OS that Mathematica works on).
For this tutorial you will have two choice. You can you the old-fashioned text-based tutorial or a video screencast. It is up to you which one to try — you should get similar information from each.
If you want to use the text based tutorial, find and open up the “Ten Minute Tutorial” – there should be a link to it off of this lab (or the lab web site). Do not let the name fool you — it should take you much more than 10 minutes.
If you want to use the screencast, go to the “Hands on Start to Mathematica”
http://www.wolfram.com/broadcast/screencasts/handsonstart/. If you do the screencast when other people are around, please make sure that you use headphones. I will not be responsible for any violence inflicted on you by other people if you blast this screencast in a public lab.
As you are working through the tutorial feel free to change things in the examples. Try out different numbers, functions, et cetera so that you have a better idea of how Mathematica works. Save a copy of the the tutorial in your home directory so that you can keep track of the changes you make while working through the tutorial.
Complete the following exercises based on the tutorial. Where appropriate print out plots and segments of Mathematica code showing your answers and tape them into your lab notebooks. Also answer the questions in your lab notebook.
The easiest way to answer the following questions is probably to have two Mathematica windows open. Keep the tutorial open in one window, and do your calculations in separate window. In your calculations window you can copy and paste all of the questions below. Then you complete each calculation under the corresponding question. When you are done you can just print the results from your window. Also, do not forget to include a written answer where one is requested.
The page numbers below refer to where you will find similar calculations in the text tutorial.


In order to get this equation in the form of the simple harmonic oscillator equation, we typically assume that the angle θ is small so that sinθ ≈ θ, which results in:
 | (3.2) |
In this exercise you will explore how justified this approximation is. In some parts of
this exercise you may have to force Mathematica to make more precise calculations.
You may have to use the Accuracy, WorkingPrecision, AccuracyGoal, and PrecisionGoal
statements to get useful results. For the purposes of this exercise we will set g/l = 1 to
simplify the math. We will also assume that the pendulum always starts out at rest
( (t = 0) = 0).
Next, solve this equation for initial amplitudes from 0 to π∕2 radians and then plot the pendulum frequency versus pendulum (angle) amplitude for your results. Also, on the same figure include a plot of what the angular frequency versus amplitude is assuming the pendulum is a simple harmonic oscillator. Take enough points so that you get a fairly smooth curve. You don’t have to use Mathematica to plot your results — any plotting program is fine.
A Severe Strain on the Credulity
As a method of sending a missile to the higher, and even to the highest parts of the earth’s atmospheric envelope, Professor Goddard’s rocket is a practicable and therefore promising device. It is when one considers the multiple-charge rocket as a traveler to the moon that one begins to doubt . . . for after the rocket quits our air and really starts on its journey, its flight would be neither accelerated nor maintained by the explosion of the charges it then might have left. Professor Goddard, with his “chair” in Clark College and countenancing of the Smithsonian Institution, does not know the relation of action to re-action, and of the need to have something better than a vacuum against which to react ... Of course he only seems to lack the knowledge ladled out daily in high schools.
The problem of the flight of a rocket is an interesting problem for both practical and more theoretical reasons. The flight of a rocket can be pursued at several different levels theoretically. The simplest level is a basic constant force problem using Newton’s Laws:
 | (4.1) |
At this simple level we would only deal with two forces — gravity and rocket thrust. In the case of vertical flight this leads to:
 | (4.2) |
where T is the thrust. Assuming constant thrust, solution of this differential equation is trivial:
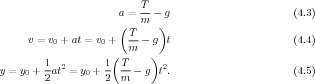
In order to analyze our model rockets we will have to deal with at least three complicating factors. In our rocket engines, thrust as a function of time will be much closer parabolic than constant, so we will have to deal with varying the thrust. Next, the mass of the rocket will change as it burns off its propellant, so we will not be able to use a constant mass in our equations. Finally, the air resistance will add another force to our equation of motion.
The simplest time-varying thrust that we can consider is essentially a square wave — the rocket engine is on at some constant value until it burns out. While this is not a good approximation to our rocket, it is a useful case to consider because it shows some features that will also appear in our more realistic thrust curves. The on/off character of this type of thrust curve leads to the technique of splitting the problem in two. First, solve for the rocket’s motion for the case of constant thrust, using the equations 4.3–4.5. Then after the rocket engine quits, start with initial conditions based on when the engine stopped and solve using the same equations with a thrust of 0.
In order to deal with thrust curves that are more realistic than square waves, we need to come up with expressions for thrust as a function of time: T → T(t). We will find the thrust curves in two ways: by using the manufacturer’s published curves (Section 4.2.2) and experimentally using a force meter (Section 4.2.3).
Since we will not be able to directly measure how the mass of the rocket engine changes during the rocket’s flight, we a need a proxy that will allow us to deal with mass as a function of time (m → m(t)). The obvious choice is to assume that for each unit of mass that is lost a constant amount of thrust is derived:
 | (4.6) |
or
 | (4.7) |
where α is a proportionality constant. With this idea we can use the initial (mei) and final (mef) mass of the rocket engine along with our thrust curve to get me(t). Solving this differential equation we get:
 | (4.8) |
or after the engine is exhausted:
 | (4.9) |
The quantity ∫ T(t)dt is known as the impulse, and it is provided by the engine manufacturer, though it also can be calculated directly from the thrust function. So we can find α using the equation 4.9 and then use it in the equation 4.8 for the time varying mass, me(t).
Air resistance is a complicated subject and for most real problems it cannot be dealt with analytically. Typically one of a variety of approximations is applied depending upon which fluid regime the problem falls under [
 | (4.10) |
where ρ is the density of air, cd is the drag coefficient, and A is the surface area of the cross-section of the rocket. We will measure the cross-sectional area, and the density of air can be determined from the ideal gas law and the weather conditions at the time of the flight of the rocket. The drag coefficient depends on the shape of the rocket and the smoothness of its surface. The drag coefficient is one of the major unknown quantities that we will determine in this lab. Values for this quantity should end up being somewhere between 0.2 and 2.
Since the form for the drag force law changes as the speed of an object changes, the drag coefficient is not constant over wide speed ranges. In this lab we will first use one type of rocket engine to determine the drag coefficient. With another type of rocket engine we will then use the drag coefficient as a known value, and predict the maximum height of the rocket.
Finally, we get to an equation including time-varying thrust, time-varying mass, and air resistance
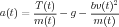 | (4.11) |
This is the equation that we will solve to find the drag coefficient for the rocket.
Follow the instructions included with the rockets for putting your rocket together. Put you parachute together, but do not attach the nose cone or parachute to the shock. You will attach the cargo section to the shock cord when you are going to launch. Sand and paint your rockets in order to have a smooth surface that minimizes drag.
In order to use the manufacturer’s thrust curves in data analysis, the curves must be converted into a numerical form. To do this we will convert the continuous curve into discrete thrust versus time values using a computer program available in room 118 PE. The program allows you to calibrate and then trace out a graph in order to convert the plot into data points. Use this program to get thrust function data for both types of engines that will be used in this lab.
To use this program log into the Unix dummy terminal next to the digitizing board. (After logging in, you may have to enter the terminal type which is “vt100”.) Tape your thrust plot to the board so that it won’t move while you are taking data. The program to use is called “digitizer.” Start the program by typing its name. Hit the “0” button on the cursor/mouse whenever you need to mark a location. For each axis in turn, choose a linear scale and then calibrate the digitizing board by choosing minimum and maximum locations and enter the numerical values for those locations. Then the program will have enter you a name and comment for your data file. You will then trace out the thrust curve with the cursor, taking data points at intervals that you find appropriate. More points should be taken when the graph is curved, fewer when its straight. For the sake of this program, you will not have to determine error bars. When you are done collecting data, press “Control-D” to stop the program. You should then plot your data using a program of your choosing to check that your curves match the manufacturers curves. Include these plots in your lab notebook.
Thrust curves will be determined using a force meter connected to a computer. Make sure that the interface is set to take data at a rate of at least 100 samples per second. See the pictures on the web for one possible way to set up this equipment. The equipment should be setup under a hood to minimize the smoke dispersal through the building. Calibrate the force meter with known masses. Have your instructor check your setup before firing the rocket engines.
Verify the thrust curve by firing three engines of a given type. Plot your three data curves. Include these plots in your lab notebook. Also, be sure to save a file of your data and export your data into a form that is useable by other programs.
Finally, please clean the fume hood when you are done with your rocket firings.
Based on your results in this section and the previous section, decide whether you are going to use the data from the manufacturer’s thrust curves or your experimental data to model the thrust of the rockets. Justify your decision. If you decide to use your experimental data, then you should come up with an experimental thrust curve that combines your trials and an estimate of the uncertainty for it.
At least four people will be needed to complete the rocket launches, so you will need to coordinate with other groups to schedule your launches. If no one in your groups has done a launch previously, then your instructor will want to go with to help you set up. Note that you will want to record the temperaturea and pressure for the dates of your launches so that you can calculate the air density.
Equipment Checklist
Rocket engines are described by names such as A8-3. The letter in the name stands for the total impulse of the rocket, with A engines having total impulse of up to 2.5 N⋅s, with each subsequent letter having up to twice the total impulse (B has 5 N⋅s, etc.). The first number in the name is the rockets average thrust in N. Finally, the last number is the delay time in seconds between the burnout of the rocket and the ejection of the parachute. In practice, this delay time seems to vary quite a bit from the published values.
Do three rocket launches with A engines and use this data to determine the drag coefficient of your rocket. If any of the three launches seem to be much higher or lower than the others, do a fourth launch. Also, do three launches with B engines and compare this data to predictions based on the drag coefficient from the A engine launches.
Several measurements will be needed for each rocket launch including the apogee (maximum altitude) of the rocket, the flight time till apogee and the initial and final mass of the rocket engine. Note that you will also need the total mass of the loaded rocket for the calculations — the engine masses are just used to find how the rocket mass changes. As described above, you will also need to determine the cross-sectional area of the rocket. Finally, you will need some weather conditions for each time that you launch, in order to determine the density of air. The name of individual measuring each piece of data should be recorded as well as the data itself in order to aid in the isolation of any systematic error.
While doing rocket launches, anyone (including the rocket launcher) not making angle measurements for the geometrical apogee determination should measure the time to apogee. Time to apogee can be difficult to determine, so having several people measure it and taking a mean is advantageous.
These rockets have an explosive charge which will deploy their parachutes. The second number on the rocket engine name is the number of seconds until the charge is supposed to detonate, but for real rockets the time till the charge varies wildly from this number. During a flight, depending on the engine and the mass of the rocket and the performance of the engine, the apogee will happen two different ways. Either the rocket’s motion will turn over before the parachute pops out, or the apogee will occur when the parachute pops out. If the motion turns over, determine the apogee based on when the rocket is at its highest height. If the parachute comes out first, mark the apogee time as when the parachute comes out since the rocket’s upward motion will be halted by the parachute. You should keep this behavior in mind when comparing your experimental results to the theoretical calculations, since the theoretical calculations do not account for the possibility of the parachute coming out early.
Two methods will be used to the determine the maximum altitude of the rocket: geometrical and electronic. The geometrical method relies on multiple observers determining the angle the rocket makes with respect to the horizontal at its maximum height. The electronic method relies on an altimeter that measures pressure changes that occur as the rocket rises in order to find its altitude.
Electronic Apogee Determination
For the electronic method we will be using PerfectFlite Pnut manual [
In order to use the altimeter you will have to install the payload section on your rocket and
include the altimeter inside the payload section. Make sure to secure the payload and
altimeter section to the rest of your rocket, so that it all descends as one piece. After the
flight connect the altimeter to the computer using the Serial/USB cable and extract the
data. Be sure to save the data with a name that you will be able to remember later
on.
Geometrical Apogee Determination
The simple method of geometrically determining the apogee of the rocket only requires the
determination of one angle and one distance. An observer measures their distance from the launch
site and then measures the angle the rocket is above the horizontal at its apogee. In this case the
altitude is
 | (4.12) |
This method’s accuracy is limited by the need for the rocket’s launch to be perfectly vertical, but it is still a good first approximation to finding the altitude. For each flight you should use this method, as well as the one described below to determine the altitude. Note that this method gives the most accurate results when θ is near 45∘.
|
|
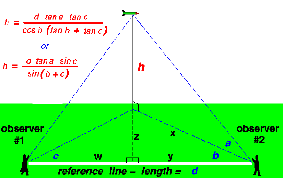
Figure 4.1 shows a more reliable method of determining altitude. In this method only the distance d, which is the distance between the two observers making the measurements, is required. As shown in the figure only the three angles a, b, and c are required. These angles are the horizontal angles (b and c) between the line connecting the two observers and the line of the rocket’s flight. The other angle (a) is the vertical angle between the ground and the rocket’s location. With this method one observer could measure one angle while the other measures two angles. To make things more robust we will have both observers measure both the horizontal and vertical angles. This will allow us to make two altitude calculations with the same set of data — one set where both angles are used from one observer and the other set where both angles are used from the other observer. Using these measurements the height of the rocket is
 | (4.13) |
[
Note that you should end up with four geometrical estimates of the apogee height for each launch — two from the simple one-angle method and two from the multi-angle method.
We will use Mathematica to solve our version of the rocket equation (equation 4.11). While performing this analysis you can refer to the sample file performing this calculation in a simplified case.
The first step in this calculation is to enter your thrust data. Those groups that determined the thrust curve experimentally should use evaluate their two types of thrust data, and use whichever type they find appropriate here. Be sure to justify your choice. Note that which whichever type of data you use. you need to have your thrust curve defined from 0 up until roughly 5 or 10 seconds. You may want to extend your thrust curve by putting in thrusts of N for times greater than 1 seond in your thurst curve files. In other other, add ordered pairs like “1 0” ...“10 0” to your files.
In order for Mathematica to be able to use this data you must enter the data into a table. To do this you will likely want to use the Import or ReadList function. Something along the lines of
![table1 = Import [“∕home ∕f13 ∕abstuden ∕A8xthrustxdata′′]](manual23x.png)
![′′
table1=ReadList[“ ∕home ∕f13∕abstuden∕A8xthrustxdata ,{N umber, N umber, N umber, N umber} ]](manual24x.png)
For the A engine data, consider the drag coefficient, cd to be an unknown and solve for it by trial and error for each of the three launches that you did with the A engines. To find cd vary it until your y(t) plot matches your measurementes of the rocket flight. Find the mean and standard deviation for the drag coefficient.
For the B engines, use the drag coefficient that you determined above to find a predicted apogee (including uncertainty) for the B engine flights. Also, re-calculate the drag coefficient using your B engine apogee data as the known quantities.
Include a printout of one version of A engine Mathematica analysis and one version of your B engine Mathematica analysis in your lab notebook.
As well as answering the questions listed above, comment on your results.
Benson, T., A beginner’s guide to model rockets, http://www.grc.nasa.gov/WWW/K-12/airplane/rkthowhi.html, 2003.
Marion, J. B., and S. T. Thorton, Classical Dynamics of Particle and Systems, Thomson, Brooks/Cole, Pacific Grove, California, 1995.
Perfect Flite, APRA Users Manual, http://perfectflite.com/APRA manual.pdf, 2012a.
Perfect Flite, DT3U Users Manual, http://perfectflite.com/DT3U manual.pdf, 2012b.
Perfect Flite, Pnut Users Manual, http://perfectflite.com/Pnut manual.pdf, 2012c.
Though outer space is often described as a vacuum, in actuality there are particles everywhere in the solar system, and there is continuous activity in the region between the celestial bodies. The study of this part of the solar system is called Space Physics [
Most of the plasma particles filling the solar system can trace their origin to the solar wind, which comes from the outer region of the sun’s atmosphere continually being blown off of the sun. The solar wind typically has a speed of about 400 km/s, though it can range up to about 1200 km/s.
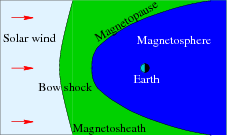
When the solar wind reaches the earth, it interacts with the earth’s magnetic field to form a region known as the magnetosphere (See Figure 5.1). The earth’s magnetosphere is the region of space where the earth’s magnetic field dominates behavior of the plasma, just as the sun’s magnetic field does in the solar wind. The magnetosphere has many regions, though only a few will be of interest to us in this lab.
The first region of interest (though it is not technically part of the magnetosphere) is known as the bow shock. The bow shock is caused by the solar wind meeting an obstruction its flow in the form of the earth. The solar wind has to flow around the the earth, and in doing a shock formed. The bow shock gets its name from the fact that the physics behind the creation of this shock are similar to the shock formed by the bow of a boat as the boat moves through the water.
Nearer to the earth is the magnetopause. The magnetopause marks the furthest that the earth’s magnetic field extends, which makes the magnetopause the boundary of the magnetosphere. The magnetosheath is the region of space between the bow shock and the magnetopause.
Nearer still to the earth are the ring currents and radiation belts (also known as the Van Allen belts). These areas are located within a few RE of the earth above the equator and low latitudes. The relatively high number of high energy particles in these areas make this region dangerous for spacecraft and difficult to observe.
The surface of the sun, and consequently the solar wind, experiences a variety of events, including flares and coronal mass ejections (CMEs). These events can change both the speed and the number density (particles per volume) of the plasma in the solar wind. When the solar wind from one of these events reaches the earth, the events are called Solar Storms or Magnetic Storms. These variations in the solar wind cause the location of the both the bow shock and the magnetopause vary. Studying the variation in the distance from the earth to the magnetopause is one of the aims of this lab.
The location of the magnetopause is important because the magnetosphere shields the earth and most satellites that go around the earth from the direct effects of the solar wind. When the magnetopause moves, some satellite that are typically protected by the magnetosphere can find themselves in the solar wind. In particular, many satellites are placed in geosynchronous orbits so that they are always above a fixed location on the earth. Geosynchronous orbits are roughly 42000 km (or 6.6 RE , where 1 RE equals the radius of the earth) from the center of the earth. During normal solar wind conditions the standoff distance of the magnetopause (the distance from the center of the earth to the point of the magnetopause that is on the line between the sun and the earth) is roughly 10 RE. During extremely strong Solar Storms the magnetopause can move in closer than geosynchronous orbit. This exposes many satellites to direct contact with extreme solar wind conditions, and satellites are often damaged or lost when this happens.
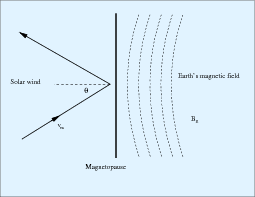
The location of the magnetopause along the line between the earth and the sun can be derived by balancing the magnetic pressure of the magnetosphere with the dynamic pressure of the solar wind (see Figure 5.2. The equation for this balance takes the form:
 | (5.1) |
where ro is the standoff distance from the earth to the magnetopause along the line to the sun measured in RE, nsw is the number density of the plasma in the solar wind in cm-3, and vsw is the speed of the solar wind in km/s [
A variety of different coordinate systems are used to measure locations in space, and in this lab you will have to use data in several of these coordinate systems. More information on these coordinate systems can be found in books [
The geocentric solar ecliptic (GSE) coordinate system has its x-axis point from the earth to the sun and its y-axis is in the ecliptic plane (the plane of the earth’s orbit) pointing in the direction of dusk (opposite the direction of the earth’s orbital motion). Its z-axis is in the direction of the ecliptic pole.
In geocentric solar magnetospheric (GSM) coordinates, as in GSE coordinates, the x-axis points from the earth to the sun. Its z-axis points in the direction of the north magnetic pole. Its y-axis, is perpendicular to the other two, so that a right-handed coordinate system results. The difference between the this system and the GSE system is a simple rotation about the x-axis.
In geocentric equatorial inertial (GEI) coordinates (also known as geocentric solar inertial (GCI)), the x-axis points from the earth to the the first point of Aries (the location of the sun at vernal equinox). This line is where the equatorial and ecliptic planes intersect. The z-axis is parallel to the earth’s rotation axis, and the y-axis complete the the right-handed coordinate system.
In this portion of the lab you will use a computer simulation to model the location of the magnetopause. The model we will use is called BATS-R-US [
This code is a magnetohydrodynamics (MHD) simulation. In MHD, a plasma is approximated as a quasi-neutral fluid, and that fluid is assumed to be governed by equations that are generalizations of the equations of fluid dynamics. MHD simulations ignore the behavior and physics of individual particles, and deal with the collective behavior of the plasma as a fluid. For this reason, MHD simulations work well on large scales, but miss much of the smaller scale physics.
To use BATS-R-US, you must first create an input file which tells the simulation the type of conditions that you would like to simulate. The input file is a simple text file with the conditions at different times listed. A sample input file is available (batrus_input_template.txt) and Table 5.1 includes a portion of one.
First, note that the first two lines are a header line which should not be included when you try to run the simulation. Next, note that the first 7 columns of the input file set the time for the conditions that follow. Since we will not be simulating real conditions from a real day, the date we pick is arbitrary, though the usual convention is to pick 1/1/2000 for the date. The time differences are significant, though for our work here we will just use a 5 minute time difference between each of the points that we use. The next six columns give the three components of the solar wind magnetic field in nT, followed by the three components of the solar wind speed in km/s. Note that Vx must be negative, so that the solar wind is moving the earth and that the simulation adds the extra constraint that the magnitude of Vx must be 200 km/s or greater. Also note that the components of B must not b 0. The final two columns are the solar wind plasma number density in cm-3 and the solar wind plasma temperature in Kelvin.
|
|
|
In this lab you will complete one simulation run where you vary, in turn, two parameters. In one part of the run you will vary V x and in the other part you will vary n. For each run you will compare the location of the subsolar point of the magnetopause to the location predicted by equation 5.1. Ask your instructor what specific range you should use for each. Note that because of the way the simulation interpolates the parameters between input lines that you will always want to have pairs of lines that have the same parameter values. If there are places where you have large jumps in input parameters (typically when you go from constant V x to constant n), you should have four lines in a row with the same values in order to give the simulation more time to settle down to an equilibrum For most simulations, there will be two places where you need to do this - at the beginning of the simulation and in the middle. Before submitting your simulation, have your instructor check your input parameters.
As stated explained above, we will be running the BAT-R-US simulation using supercomputers at CCMC. This section describes how to submit your simulation run.
Once you have submitted the job, you will be sent an email confirmation. After your run is complete, another email will be sent to you.
After your simulation run has been completed, you can use the online tools to view the results of your run. To get to these tools, hit the “View Model Run Results” link from the main CCMC page. The click Global Magnetosphere Models Results. Find your run either by searching for your name or by browsing through the list of results, then click the link. Then click the link to “View Magnetosphere.” This will bring you to a complicated web form which you can use to view your results. The simulation results can be viewed in many different ways, though we will only use a few of them.
First you should use the web form to make an animated movie of your results. To do this choose “Create GIF movie with current plot settings” near the top of the screen. Then just below that set the start and end time of your movie to the start and end time of your simulation run and add your email address. Then you need to choose the type of plot to use for the movie — for this first movie, just use the default choices of “ColorContour2D” and “N” (number density). Near the bottom, choose a plot range of X=(-80, 25), and Z=(-48, 48). Choose Y to be the cut plane with a value of y=0. Then hit the “Update Plot” button and a short time later your will receive a link to your movie.
You should also try an animated gif with plot type “Contour (2D)” and clicking the “Show magnetic topology” checkbox.
Save copies of your movies in your home directories and email copies of them to your instructor. Print one frame from each movie on a color printer, and include it in your lab notebook. Describe what you see in the movies in your lab notebook.
The simulation can determine the magnetopause location for you. To use these functions, go back to the page where you chose “View Magnetosphere” and now choose “View Magnetopause standoff and closest approach within 30 deg. of Sun-Earth line (local noon).”
For this plot type, choose to plot your whole time range (which will probably be set automatically. Also, choose to display all three data types that are possible on this plot: “mpnose”, “rpmin”, and “lt_at_rmin”. Take the uncertainity in all of the upplied distances to be 0.1 RE. The one of these that you will be most interested in is “mpnose” which is the distance from the center of the earth to the subsolar point of the magnetopause. Save a copy of this plot. Also click the option at the bottom to save the data to a text file, and be sure to save the text file.
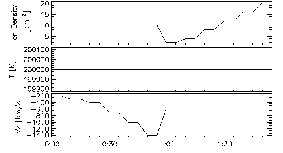
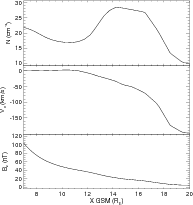
First you want to choose which time point of your simulation to look at under the “Choose data time” option. If you used the data input scheme suggested above where the input parameters are constant for times in a row, then you will want to look at the second time of each pair. In order to find the subsolar point of the magnetopause, it easiest to look at a line plot of various plasma parameters, so choose “Plot Mode” of “Line Plot.” Since the subsolar point in on the x-axis, choose “Y1”,“Y2”, “Z1”, “Z2” all equal to 0 under the “Choose Plot Area” section at the bottom of the screen. For the x-limits you will want to start out with a range that is sure to include your magnetopause, and then zoom in once you have found the subsolar point of the magnetopause. In order to determine your magnetopause, you should take a look at several of the following data quantities: V x, B, Bx , By , Bz , and n. Figure 5.4 is an example of the sort of plot that you will want to make.
|
|
The magnetopause boundary should be roughly visible in your plots as the location where the plasma parameters are changing rapidly from the solar wind values which you input, to the magnetosphere values. Recall, though there there are two boundaries near each other in this region. The bow shock, which separates the solar wind from the magnetosheath and the magnetopause which separates the magnetosheath from the magnetosphere. The key point to remember when searching for the magnetopause location, is that the magnetopause defines the outer boundary of the region where the earth’s magnetic field dominates.
In Figure 5.4, the magnetopause is located at roughly 11 RE. In the number density plot, the bump in the number density corresponds to the buildup of plasma in the magnetosheath, so the inner boundary of that bump corresponds to the magnetopause. In the plot of the x-component of the velocity, the magnetopause is seen as the location where the value goes to 0, since the plasma from the solar wind is diverted around the magnetosphere at the magnetopause. Finally, in the plot of the z-component of the magnetic field, there is an almost imperceptible shift at 11 RE. So in this case, counterintuitively, it is easier to find the magnetopause in the plasma results for the the simulation than in the magnetic field results.
Come up with your own standard to decide where the magnetopause is and make sure that you use more than one parameter in making your decision. Note that the point where two lines representing different quantities cross has no physical significance. Based on your standard, you should assign a value for the uncertainty of the location of the subsolar point based on how precisely you can determine the locations from your plots. Be sure to save the plots that you use for finding the subsolar point to a file. You should include copies of these plots in your lab notebook. Note that if you defined your input parameters as suggested, then you only need to find the magnetopause location for the last time for each of the sets of input parameters that have the same paramter values.
The distance from the earth to is magnetopause is given roughly by the equation 5.1. This equation makes the assumption that the solar wind for a typical momentum flux of 2.6 nPa (nv2) leads to a magnetopause location at about 10RE [
For this part of the lab, you will be examining what spacecraft observations of the magnetosphere tell us about the behavior of the magnetopause under extreme solar wind conditions and how those results compare to the magnetopause models already mentioned. You will use solar wind data to predict where the magnetopause is in the vicinity of a number of satellites and you will check to see if the data from those spacecraft show the spacecraft crossing the magnetopause at the predicted times.
Three specific extreme solar wind events will be examined: October 31 2003, July 15 2000 (Bastille Day storm), and May 4, 1998. For each event the solar wind data was collected from the Advanced Composition Explorer (ACE) satellite from cdaweb.gsfc.nasa.gov. ACE resides at about 210 RE from the earth on the line between the earth and the sun. On board ACE is an array of instruments to measure the solar wind. Solar wind plasma data (SWEPAM) and magnetic field data (MAG) are the two instruments that we will be using data from. The SWEPAM instrument takes the solar wind velocity, ion density, and ion temperature, while MAG takes the magnetic field intensity.
Along with ACE data, we will be using data from several other satellites. These satellites are of several different classes. The GOES satellites are weather satellites and the data that they take that is of interest to us is magnetic field data (MAG) and energetic particle data (EP). The L satellites are run by Los Alamos National lab and contain plasma data, low and high energy ions as well as electron number densities. All GOES and L satellites are in geosynchronous orbit. We will also be using data from two NASA satellites with more interesting orbits — Geotail and Polar. Geotail has ion number density and speed data (CPI), and magnetic field data (MGF) that we will be using. Polar has magnetic field (MFE) data that we will be using. During the events listed above these satellites spend at least some time inside the magnetosphere. The point of this lab is to check the satellite data for signs of having crossed the magnetopause and compare that to predictions of equation ??.
For each event the earth’s magnetopause location has already been calculated using equation ?? based on ACE data which is also included in the spreadsheet. The position of the magnetopause along with the location of a particular satellite. These results are included in spreadsheet files which have been stored under the data directory on the course web site. These spreadsheets can be read using the “gnumeric” program. The predicted magnetopause location and the satellite’s distance from the earth have also been saved into text files ending with “.txt”, but are otherwise named the same as the spreadsheets. You will need to use these text files to create your own plots of the predicted magnetopause crossings. Along with the spreadsheet files are data files which you will want to compare to the magnetopause location data. These files contain either magnetic field data or ion number density data. The data files that you will want to use all end in “_nt.txt”.
|
|
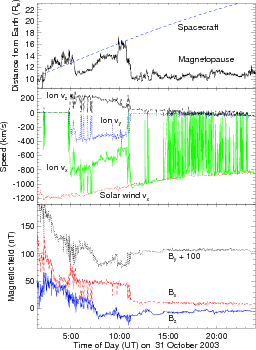
Figure 5.5 shows an example of the type of analysis you will be doing with this data, though you do not have to try to get all of the data on one plot. To make your plots, you can use the the iplot feature of a program called idl. Directions on how to use this program are in the file iplot_tutorial.txt.
Depending on the data that you are using, it may be easiest to have one plot with the spacecraft data open and another plot showing the spacecraft position as well as the predicted position of the magnetopause. If you have the same time scale on each plot, then you can compare the features on each plot to determine whether the data supports the idea of having magnetopause crossings where they are predicted by the other plot.
The example data in Figure 5.5 shows Geotail data from October 31, 2003. On that day a large CME hit Earth, causing auroras that were visible throughout much of the United States.
The top panel of Figure 5.5 predicts several magnetopause crossings, but the most notable crossings are at roughly 5:00, 10:00, and 11:00. From 1:30–5:00 and from roughly 10:00–11:00, Geotail is predicted to be inside the magnetosphere. In other words, at those times Figure 5.5 shows the magnetopause further from the Earth than the spacecraft is. For most of the rest of that day Geotail was inside the magnetosphere. The data in the middle and bottom panels of Figure 5.5 shows the crossing from inside to outside the magnetosphere at 11:00 and the data also shows other magnetopause crossings, though as described below the crossings seen in the data differ a bit from the predictions. Note that the prediction of the magnetopause location is based on solar wind data from outside the magnetosphere. The time its takes the solar wind to get to the spacecraft from the place at which it is measured varies, but it typically about 15 minutes. So we should expect to see magnetopause crossings slightly earlier in the predictions than in the data.
The middle panel of Figure 5.5, which shows the ion flow velocity measured by Geotail and the x-component of the solar wind speed measured by ACE, has three visible regimes. During this day the x-component of the solar wind velocity slowly changes from -1200 km/s to -800 km/s. From 0:00–5:00 most of the Geotail ion flow velocity data is missing. From 5:00–11:00 the three components of the ion flow velocity measured by Geotail oscillate near values of -700 km/s, -400 km/s, and 200 km/s respectively. While from 11:00–24:00 the y- and z-components oscillate near 0 km/s, and the x-component is based at roughly -1000 km/s, with spikes up to almost 0 km/s. The behavior of the x-component during this last time period can be interpreted as being due to the spacecraft being just outside the magnetopause in the magnetosheath. When the x-component is near -1000 km/s it matches the solar wind speed, suggesting that Geotail is outside the magnetopause at those times. The noisiness of these measurements of the ion speed in the magnetosheath is likely due to reflection of the solar wind ions off the magnetopause and the movement of the magnetopause as the solar wind conditions vary.
The velocity measurements act much differently from 5:00–11:00, suggesting that the spacecraft is inside the magnetosphere during those times. Notice that during this time there are several short time periods where all components of the data have spike which match their magnetosheath values. This suggests that during this time period the spacecraft is near the magnetopause boundary and that fluctuations in the solar wind cause the magnetopause to oscillate back and forth across Geotail’s position.
The third panel, showing Geotail’s magnetic field measurements, has similar regions of behavior. From 0:00–11:00 all three components have spiky measurements which trend downward. The downward trend is due to the decreasing magnitude of the Earth’s dipole field as Geotail gets further from Earth, while the spikes are due to disturbances in the plasma in the magnetosphere during this magnetic storm. From 11:00–24:00, the three components are steadier and oscillate near 10 nT, 5 nT, and -10 nT, respectively. During this time Geotail is in the magnetosheath where the solar wind magnetic field dominates. Note that during several of the spikes in the magnetic field which occur between 0:00 and 11:00, that the magnetic field matches the magnetosheath values. This supports the idea that the magnetopause oscillated back and forth past the spacecraft, as was mentioned with the ion velocity data.
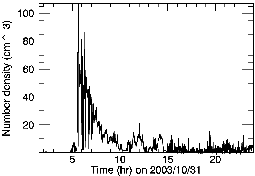
The number density plot shows similar behavior. There is a large spike in the number density just after 5. That peak slowly decays until about 10, after which there are several smaller peaks. Once again, this plot shows geotail inside the magnetopause from roughly 5-10, and in the magnetosheath afterwards.
For the cases you will look at, for each satellite there is some sort of data you should examine to try to confirm the location of the magnetopause. In some cases the satellite never crosses the theoretical magnetopause, but you need to check that the data shows the same thing. When examining the satellite data, pay particular attention to the times at which the theoretical magnetopause location plot shows the satellite crossing the magnetopause. Note any signs of a magnetopause crossing. Based on your examination of the data and the theoretical magnetopause location, determine if you believe the satellite crossed the magnetopause and if so at what time[s].
Be sure to analyze potential magnetopause crossings in each set of data before going on to the question before. You describe whether each data plot supports any potential crossings that you see.
Listed below are the events and the data that we have available for them. Your instructor will tell you which events you should look at.
| Event | May 4, 1998 | July 15, 2000 | October 31, 2003 |
| Satellites | GOES 9 | GOES 8 | Geotail |
| L4 | GOES 10 | GOES 10 | |
| L7 | L1 | GOES 12 | |
| Polar | L4 | L0 | |
| L9 | L1 | ||
| L4 | |||
| L7 | |||
ESA, Coordinate systems and transformations, http://www.spenvis.oma.be/spenvis/help/background/coortran/coortran.html , 2005.
Hansen, K., G. Tóth, A. Ridley, and D. DeZeeuw, BATS-R-US User Manual: Code Version 7.5.0, http://csem.engin.umich.edu/docs/HTML/USERMANUAL/USERMANUAL.html, 2002.
Kivelson, A., M. G. Kivelson, and C. T. Russell, Introduction to Space Physics, Cambridge University Press, London, 1995.
NASA, http://ccmc.gsfc.nasa.gov/, 2005.
Shue, J.-H., J. K. Chao, H. C. Fu, C. T. Russell, P. Song, K. K. Khurana, and H. J. Singer, A new functional form to study the solar wind control of the magnetopause size and shape, J. Geophys. Res., 102(a5), 9497–9512, 1997.
Shue, J.-H., et al., Magnetopause location under extreme solar wind conditions, J. Geophys. Res., 103(A8), 17,691–17,700, 1998.
There are many ways to determine the speed of sound. The method we will use in this lab is both fairly straight forward and the equipment needed is fairly minimal. We will be creating sounds and recording them with two microphones. We will measure the difference in distance between the paths the sounds take from going to the two microphones. We will then study the recorded signals of the sound to see the time difference between how long the sound took to get to each microphone. Our measurement of the speed of sound will be the result of dividing the difference in distance by the difference in time.
Sound is a vibrational wave that travels through a medium. The speed of sound in a medium depends on how quickly the energy of the vibration can be transferred across the medium. While the details of the equations that are used to find the speed of sound will vary depending on the state of the medium, the basic equation
 | (6.1) |
describes the wave where u describes the medium the wave is moving through, and c is the speed of the wave [
In a sound wave, the general method to find the speed is from
 | (6.2) |
where p is the pressure and ρ is the mass density [
For gases, the bulk modulus is not always easy deal with, since it will in general vary with temperature, pressure, and density. So the speed of sound equation is often recast using the terms of ideal gases:
 | (6.3) |
where γ is adiabatic index (which is equivalent to the specific heat at constant pressure divided by the specific heat at constant volume), k is Boltzmann’s constant, T is the temperature and m is the molecular mass [
In this lab we will be using the program audacity on a Linux computer to record sounds received by two microphones. Using the provided adapters you will save one microphones sound as the left track of a stereo recording and one as the right track. For all of the measurements that you make below, be sure to establish reasonable uncertainties and to make notes in your lab notebook about why you picked the uncertainties that you used.
Record the air temperature, pressure and humidity for the time of your measurements. Currently we have 1 device that will make all three measurements.
Your first order of business is to figure out how you need to use the provided adapters and cords to hook up the microphones to the computer. Once you believe that you have the cords set up right, open up audacity and configure that program to receive stereo input. Then test each microphone separately, to be sure that they are providing signals to the correct channel. Once you are convinced that each microphone is working correctly, try both microphones at the same time. Play with causing a sound closer to one microphone or the other and see if your recorded signals make sense.
Once you are convinced that your setup is correctly recording the signals to both microphones, take several sets of data that you can use to find the speed of sound. Remember that the distance that will go into your calculations is the difference in the path length traveled by the sound to each microphone.
For the time difference between how long it takes the sounds to get to each microphone, first use audacity directly. Zoom in on your recordings, pick notable locations in the sound waves, and read off the time difference between when those portions of the wave appear in the left and the right channels. Be sure to assign an uncertainty to the time difference. Be sure to print off at least one set of sample signals from audacity and use the plots when explaining your method. You may need to create a screenshot in order to extract plots from audacity.
Repeat this process for at least five different path length differences for the sound’s travel to the two microphones. Be sure to have your path difference use the entire range of possible values allowed by the supplied equipment. Plot your results as path length difference versus time delay and fit the line to find a value for the speed of sound in air.
In this section of the lab you are in charge. Use the techniques that you learned in the previous section to find the speed of sound in some material other than air. In your lab notebook describe in detail what you do on this portion. Note that you should be very careful to condsider the fact that the sound may travel both through the material that you are attempting to test and the air.
Halliday, D., R. Resnick, and J. Walker, Fundamentals of Physics, sixth ed., Wiley, 2001.
Hecht, E., and A. Zajac, Optics, second ed., Addison-Wesley, 1987.
Landau, L. D., and E. M. Lifshitz, Fluid Mechanics, second ed., Pergamon Press, 1993.
Oscillations show up throughout physics. From simple spring systems in mechanics to atomic bonds in quantum physics to bridges blowing the wind, physical systems often act like oscillators when they are displaced from stable equilibria.
In this experiment you will observe the behavior of a simple sort of oscillator: the torsion pendulum. In general a torsion pendulum is an object that has oscillations which are due to rotations about some axis through the object. This apparatus allows for exploring both damped oscillations and forced oscillations.
Note that angular frequency (ω in rad/s) and frequency (f in Hz.) are not the same. Most the equations below concern ω, in many cases it is easier to measure f.
In the damped case, the torque balance for the torsion pendulum yields the differential equation:
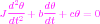 | (7.1) |
where J is the moment of inertia of the pendulum, b is the damping coefficient, c is the restoring torque constant, and θ is the angle of rotation [
In the underdamped case (β < ω0):
 | (7.2) |
with the oscillation frequency ω1 =  , initial amplitude θ0, and phase γ.
In the critically damped case (β = ω0):
 | (7.3) |
In the overdamped case (β > ω0):
![-βt ω2t -ω2t
θ(t) = e [A1e + A2e ],](manual39x.png) | (7.4) |
where ω2 =  .
.
For the forced oscillation case, an external torque is added to Equation 7.1:
 | (7.5) |
where ω is the driving frequency and τ0 is the driving torque [
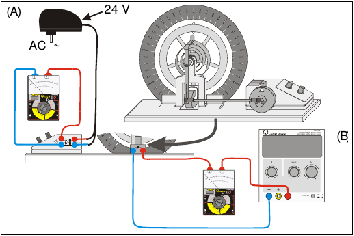
In this experiment you will use the torsion pendulum, the power supply for the driving motor, a low voltage power supply for the eddy current damper, two digital multimeters, and a stop watch.
Figure 7.1 shows the torsion pendulum and associated electronics. The motor which is used to force the pendulum (which will only be used in the second half of the experiment) is shown on the left of the diagram. The eddy current damping device is shown on the bottom of the diagram.
|
7.3.1 Notes on the Torsion Pendulum
7.4 Procedure
7.4.1 Damped OscillationsFirst, setup the torsion pendulum apparatus, with the forcing motor turned off and play with it to get an idea of how it works [
Nearly Free MotionWith damping magnet turned off, find the natural frequency by measuring the period of the torsion pendulum. You will probably get better results if you use the time it takes the pendulum to oscillate 10 or 20 times to find the period. Note that even with the current off, friction does cause some damping of the pendulum. So the motion is not quite simple harmonic motion.
Damping ConstantPick a small value of the damping current (0.1 A < I < 0.3 A) and determine the damping constant. To do this first measure the period several times. Then start the pendulum from its furthest rotation point and measure φ after each period. If you have difficulty taking the φ measurements, you may need to try again. Plot φ versus time. Your plot should follow an exponential envelope. Fit your data to find a value for the damping constant, β. Repeat this process for a higher value of the damping current (0.3 A < I < 0.6 A).
Nearly Critically and Critically DampedIncrease the damping current until the system only completes one oscillation after you let it go from its furthest rotation point, so the pendulum only crosses 0 once and then approaches 0 from the negative side. Find the oscillation time for this case by taking several measurements and taking the average. Then increase the current until the pendulum approaches 0 from the positive side, but never crosses 0. This is the critically damped case. Use several measurements for the time it takes the pendulum to reach the equilibrium in this case. Now use the critically damped case to get an estimate of the damping constant, β, in this case. Find the damping constant from equation 7.3 by measuring the time that it takes the pendulum to reach some fixed θ, say θ0∕10, after releasing it from its furthest rotation point. Note that in this case you can assume B = 0 and that A = θ(t = 0) in equation 7.3. Since ω0 = β in the critically damped case, you can use this β to get estimates of the damping coefficient, b, and the restoring torque, c. Recall that J = 3.0 ± 0.1 kg ⋅ m2. Now put the current at a higher value (but remember to keep it under 2.0 A). This is an overdamped case. Find the oscillation time in this case.
7.4.2 Forced OscillationsFirst, setup the torsion pendulum apparatus with the forcing motor turned on and play with it to get an idea of how it works [
Resonance CurveFind the resonance frequency of the torsion pendulum from a amplitude versus driving frequency plot for the torsion pendulum. In this section, you will need to decide on a procedure yourself, based on what you know about the device and resonance curves. Find resonance curves for three different brake currents (~ 0 A, ~ 0.4 A, and 0.8 A). Also, find the damping constant for those three cases. Repeat this process for a small (I ~ 0 A) and a large (I ~ 0.8 A ) damping current.
7.5 Conclusions
7.6 Bibliography
Leybold Scientific, Free Rotational Oscillations, Leybold Scientific, http://www.leybold-didactic.de/literatur/hb/e/p1/p1531_e.pdf, 2006a. Leybold Scientific, Forced Rotational Oscillations, Leybold Scientific, http://www.leybold-didactic.de/literatur/hb/e/p1/p1532_e.pdf, 2006b. Thornton, S. T., and J. B. Marion, Classical Dynamics of Particles and Systems, fifth ed., Brooks/Cole — Thomson Learning, Belmont, California, 2004.
|